Categories
Community

Advanced git: Demystifying git Remotes and git cherry-pick: Powerful Tools for Collaboration

Collaboration is key in the world of Git version control. But keeping track of changes from multiple developers can get tricky. This blog post dives into two essential Git features—remotes and cherry-pick—that empower you to streamline your workflow and effectively manage contributions.

{{ advertisement }}

Understanding Git Remotes: A Bird’s Eye View

By default, your GitHub repository typically has a single remote—the origin, representing the main repository you cloned from. However, in larger projects with multiple developers, things get more interesting. Often, developers create personal forks before they push their code.This allows them to work on a separate copy of the code base, and once they are satisfied with the changes, they can merge back into the main codebase.

Here’s where remotes come into play. They are references to additional copies of your Git repository, potentially containing valuable contributions from other developers.


NEW Developer Nation survey is live! Participate, shape the trends in software development, and win big. Start here!


Let’s use an Open-Source project: Lottie

Imagine we’re working with the fantastic Lottie by Airbnb, a library that renders After Effects animations on mobile platforms. We’ve cloned a fork (iayanpahwa/lottie-android) and want to explore changes made by other contributors to lottie (gpeal and felipecsl).
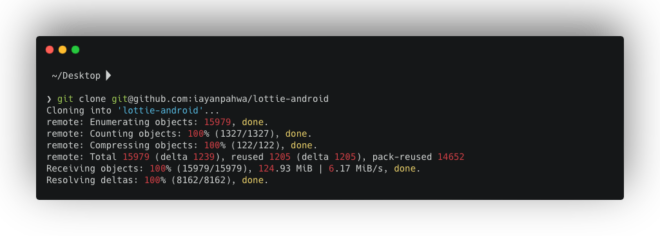
Adding Remotes: Reaching Out to Other Forks

To access these developers’ workspaces, we can add them as remotes using the git remote add command:

git remote add <remote_name> <repository_URL>

For example:

git remote add gpeal https://github.com/gpeal/lottie-android.git
git remote add felipecsl https://github.com/felipecsl/lottie-android.git

Now, using git remote -v, you can see all configured remotes, including their URLs.
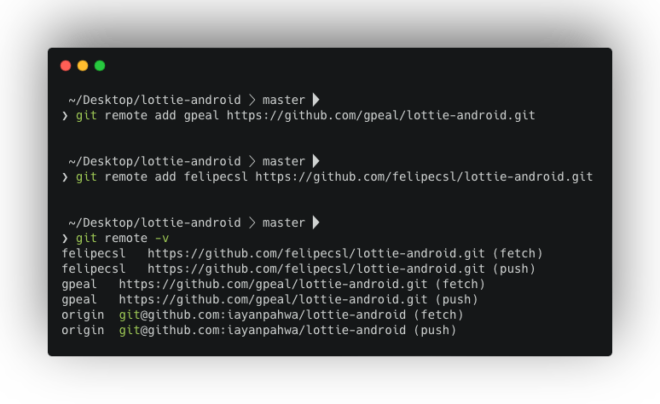
Fetching the Goods: Downloading Changes

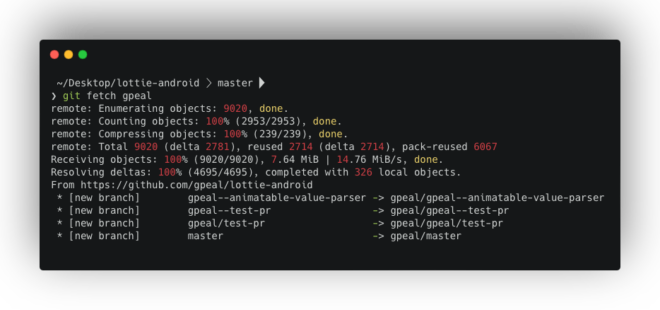
With remotes in place, we can retrieve changes from other contributors using git fetch.

  • Fetching from a specific remote:
  • Fetching from all configured remotes:
	git fetch --all

This downloads the commits made by these developers without integrating them into your local working directory yet.

git cherry-pick: Borrowing the Best Bits

Git cherry-pick allows you to meticulously select and apply specific commits from other branches (including those fetched from remotes) onto your current branch. This is particularly useful for integrating contributions from multiple developers, testing them individually, or incorporating specific fixes.

A Real-World Cherry-picking Scenario

Imagine you manage an open-source project that receives a wave of pull requests. You might want to test these contributions together before merging them. Here’s how cherry-picking can help:

Create a New Branch:

git checkout -b my-test-branch
  1. Fetch Necessary Code (if not already done): Use git fetch as explained earlier.
  2. Cherry-picking Commits: Once you have access to the desired commits, cherry-pick them one by one using their commit hashes:
git cherry-pick <commit_hash>

For instance, to test a specific commit (648c61f5275998c461347b5045dc900405306b31) by contributor gpeal:

git cherry-pick 648c61f5275998c461375647845dc900405306b31 [ commit made by gpeal ] 

This brings gpeal’s changes to your my-best-branch for isolated testing.

Remember: Cherry-picking can rewrite history, so use it cautiously. Always create a dedicated branch for testing before integrating changes into your main codebase.

Wrapping Up:

By mastering remotes and cherry-pick you can effectively collaborate on Git projects, leverage valuable contributions from others, and ensure a smooth and efficient development workflow.

Feel free to reach out with any questions! Happy coding! Do check our blogs on git internals for more learning: 

NEW Developer Nation survey is live! Participate, shape the trends in software development, and win big. Start here!

Categories
Community

Managing Complex Dependencies with Google’s repo tool

In my last blog, I discussed managing dependencies with git submodules. However, when working with large projects that have many dependencies, traditional methods like git submodules can become cumbersome. Google’s repo tool emerges as a powerful solution specifically designed to handle this challenge.

What is repo tool?

repo is an in-house dependency management tool developed by Google. It excels at managing many dependencies, making it ideal for projects like the Android Open Source Project (AOSP) and custom Android ROMs.

Unlike git submodules, which are an integrated git feature, repo functions as a separate executable script. This necessitates installation before diving in.

Installation (Choose your adventure!)

Linux: 

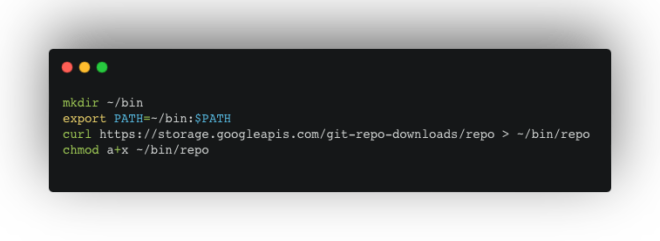
Create a directory for Repo:

mkdir ~/bin

Update your PATH environment variable:

export PATH=~/bin:$PATH

Download and make Repo executable:

curl https://storage.googleapis.com/git-repo-downloads/repo > ~/bin/repo
chmod a+x ~/bin/repo
Google repo tool

OSX:

Use Homebrew to install Repo:

brew install repo
Google repo tool

For other platforms, refer to official docs: https://gerrit.googlesource.com/git-repo

Manifest Magic: Defining Dependencies

Repo relies on a manifest file stored in a separate Git repository. This XML file is the central hub, outlining where to fetch project dependencies, their storage location, and specific revisions (commits).

The beauty of Repo lies in its ability to manage multiple manifests. Imagine a huge, complex project like the Android Operating system with 100 dependencies. You could create a dedicated “lib.xml” manifest to fetch those specific libraries, eliminating the need to include hundreds of unrelated dependencies from a broader manifest. Similarly, the testing and compliance team can have “qa.xml” and “compliance.xml” to manage extra QA and compliance-related dependencies separately, which might not be needed in production but required during development. Both could also have the same libraries but different versions. Hence repo using manifest.xml makes handling dependencies extremely flexible. 

For this demo, we’ll keep things simple with a single “default.xml” file.

Creating a Manifest

Clone the Example Repository having our manifest:

git clone git@github.com:iayanpahwa/manifest-demo.git

Examine the default.xml file:
This file specifies the main Project (ex, EazyExit) with two dependencies, FastLED and PubSubClient, along with their corresponding URLs, paths, and revision IDs.

<?xml version="1.0" encoding="UTF-8"?>
<manifest>

<remote fetch="https://github.com/iayanpahwa/" name="EazyExit" />
    
    <project name="FastLED.git" path="lib/FastLED" remote="EazyExit" revision="c1ab8fa86f6d6ecbf40ab7f28b36116a3c931916" />
    <project name="pubsubclient.git" path="lib/PubSubClient" remote="EazyExit" revision="dddfffbe0c497073d960f3b9f83c8400dc8cad6d" />

</manifest> 

Note: The manifest allows for various configurations, including project branches and alternative remotes (like Bitbucket or GitLab). Refer to the official documentation for a comprehensive list: https://gerrit.googlesource.com/git-repo/+/master/docs/manifest-format.md

Putting it All Together: Fetching Dependencies

  1. Push the default.xml file to your GitHub repository (if using the provided example).
  2. Create a project directory (e.g., EazyExit).

Navigate to your project directory and initialise Repo

Google repo tool

3. This command establishes the current directory as your project workspace.

Fetch dependencies using the repo sync command:

4. This command retrieves all dependencies specified in the manifest and stores them according to the defined paths.

By leveraging repo, you can effectively manage many dependencies within a single, streamlined workflow.

Repo empowers you to manage complex dependencies with ease, promoting a more flexible and adaptable development process. Checkout our other blogs on: 

NEW Developer Nation survey is live! Participate, shape the trends in software development, and win big. Start here!

Categories
Community

How Git Submodules Can Save You Time (and Headaches): Taming the Dependency Beast

In software development, we rarely build projects entirely from scratch. We leverage open-source libraries and frameworks to accelerate development and avoid reinventing the wheel. But managing these dependencies can quickly become a tangled mess, especially as projects grow and dependencies multiply.

This blog post explores a simple yet powerful Git feature called git-submodule, which streamlines dependency management and keeps your codebase clean and organised.

Git Submodules

NEW Developer Nation survey is live! Participate, shape the trends in software development, and win big. Start here!


The Downside of the Manual Approach

Many developers resort to simply manually cloning and directly pushing dependency code into their main project’s codebase. While this may seem convenient at first, it creates several challenges:

  • Version Control Issues: Updating dependencies becomes a manual process, increasing the risk of compatibility issues and security vulnerabilities.
  • Upstream Changes: New features or bug fixes in the original library require manual integration, which is time-consuming and error-prone.

Introducing Git Submodules

git submodules allow you to integrate external Git repositories (containing your dependencies) directly into your project. This creates a modular approach with several benefits:

  • Independent Updates: You can update submodules individually without affecting your main project code.
  • Version Tracking: Submodules track the specific commit hash of the dependency you’re using, ensuring consistency and reproducibility.
  • Modular Codebase: Your project remains clean and organised, with dependencies clearly separated from your core code.

Putting Git Submodules into Action

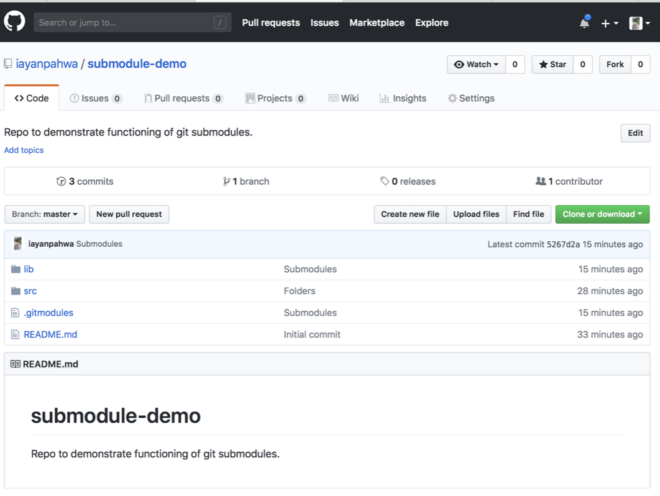
Let’s walk through a practical example. Imagine a project named “submodule-demo” that relies on two libraries:

  • FastLED: A library for controlling LEDs
  • PubSubClient: A library for implementing an MQTT client
Git Submodules

Here’s how to leverage git-submodules to manage these dependencies:

  1. Project Structure: You can create a dedicated directory (e.g., lib) within your project to store dependencies.
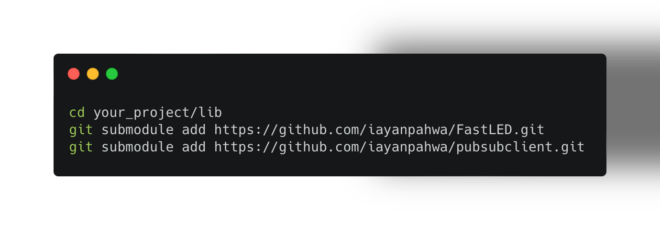
  2. Adding Submodules: Use the git submodule add command to specify the URL of the external repository and the desired submodule path:
cd your_project/lib
git submodule add https://github.com/iayanpahwa/FastLED.git
git submodule add https://github.com/iayanpahwa/pubsubclient.git
Git Submodules

This fetches the code from the specified repositories and stores them within the lib directory.

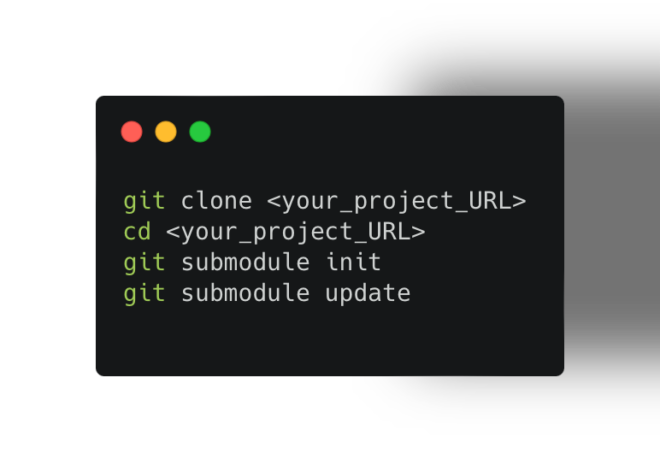
3. Initialising and Updating: Anyone cloning your project can easily initialise and update the submodules using the following commands:

git clone <your_project_URL>
cd <your_project_URL>
git submodule init
git submodule update
Git Submodules

Alternatively, you can use the --recursive flag during cloning to automate these steps:

git clone --recursive <your_project_URL>
Git Submodules

4. Version Control: Git submodules record the specific commit hash used from each dependency. This ensures everyone working on the project uses the same library version, promoting consistency and preventing compatibility issues.

Beyond the Basics:

While submodules default to fetching the latest commit from the dependency’s main branch, you can specify a different branch or commit hash. Refer to the official Git documentation (https://git-scm.com/book/en/v2/Git-Tools-Submodules) for details on advanced usage.

Key Takeaways

By embracing git submodules, you can effectively manage dependencies, improve code organization, and streamline project collaboration. This approach promotes a more modular and maintainable codebase, saving you time and headaches in the long run.

Feel free to explore our other blog posts on Git internals for further insights!

Git Internals Part 1- List of basic Concepts That Power your .git Directory

Git Internals Part 2: How does Git store your data?

Git Internals Part 3: Understanding the staging area in Git

NEW Developer Nation survey is live! Participate, shape the trends in software development, and win big. Start here!

Categories
Developer Nation Broadcast

The state of Data Science and future of Generative AI with Anand Mishra

In this captivating episode, we delve into the dynamic journey of Anand Mishra, the CTO of Analytics Vidhya, a frontrunner in the Data Science realm. Anand shares his transformative evolution from a Data Scientist to assuming the pivotal role of CTO, illuminating the intricate pathways and milestones that shaped his career trajectory. As we navigate through his experiences, listeners gain invaluable insights into the evolving landscape of Data Science, particularly amidst the burgeoning influence of AI.

Anand provides a compelling narrative on where the field of Data Science is headed, painting a vivid picture of its metamorphosis under the relentless march of artificial intelligence. From the intricate nuances of modern data analytics to the potential unleashed by generative AI, Anand’s perspective offers a glimpse into the future of this rapidly evolving domain.

With each anecdote and observation, Anand weaves a narrative that not only captures the essence of his personal journey but also serves as a compass for those navigating the ever-changing seas of Data Science and AI. Join us as we unravel the tapestry of innovation and exploration in this thought-provoking conversation with one of the foremost voices in the field.

Tune in to uncover the untold stories, gain exclusive insights, and embark on a journey of discovery that promises to illuminate the path ahead in the enthralling world of Data Science and AI.

Categories
Community

Understanding Practical Engineering Management – Developer Teams & Hiring with Mirek Stanek

This episode features Mirek Stanek, an experienced Engineering Manager and author of the blog “Practical Engineering Manager.” Ayan and Mirek engage in a conversation covering several crucial aspects of software development:

  • Software Project Planning: They delve into the art of planning software projects effectively. This involves discussions on setting goals, defining clear roadmaps, breaking down tasks, and utilizing project management tools and methodologies.
  • Managing and Motivating Engineers: Mirek shares his insights on building and leading successful engineering teams. He discussed strategies for fostering communication, collaboration, and a positive work environment, along with techniques for keeping engineers motivated and engaged.
  • Climbing the Ladder: Aspiring engineers can gain valuable knowledge as Ayan and Mirek explore the topic of career advancement in software development, skills and experiences needed to progress, strategies for professional development, and navigating career transitions.
  • Hiring: The conversation also touched upon the complexities of hiring talented engineers. Mirek, with his expertise, might share insights on building a strong hiring process, conducting effective interviews, and identifying the right individuals for the team.

This episode offers guidance for both aspiring and experienced software engineers, providing valuable insights on project management, team leadership, career growth, and the hiring process. By listening to Mirek’s expertise and Ayan’s engaging discussion, listeners can gain valuable knowledge and practical tips for navigating the world of software development.

Categories
Community

Cross-Platform Apps, Solopreneurship, and Course Creation with Simon Grimm

This podcast episode features Simon Grimm, a multi-faceted entrepreneur and content creator behind DevDactic, Galaxies.dev, and the Ionic Academy. The discussion revolves around three key areas:

  1. Cross-Platform Applications: Ayan and Simon delve into the world of cross-platform app development, exploring the benefits and challenges of building apps that work seamlessly across different platforms like mobile and web. They also discussed various frameworks and tools available for efficient cross-platform development.
  2. Solopreneur Journey: Simon shares his experiences and insights as a solopreneur content creator. He talked about the initial steps he took, the challenges he faced while building his ventures, and the strategies he used to stay motivated and productive.
  3. Course Planning and Execution: Ayan and Simon delve into the process of planning and executing courses, likely specific to the context of Simon’s online academies. They also discussed topics like identifying course themes, structuring content, building engaging learning experiences, and reaching the target audience.

This episode offers valuable insights for aspiring developers, content creators, and solopreneurs interested in learning from Simon’s experience in building successful online businesses and educational platforms.

Categories
Community

Exploring the Landscape of Enterprise Development: A Regional and Technological Perspective

Forget about dusty old maps and boring stats – imagine navigating the ever-changing jungle of enterprise software development! It’s like discovering hidden tribes of people who code in modern programming languages (Python! Kotlin!), use cutting-edge CI/CD tools – Jenkins, CircleCI and work in big teams and have years of experience bringing an idea to life from the ground up by writing the most optimised code. It’s like building magical castles in the cloud. 

That’s where we’re headed, adventurer! We’ll trek through Silicon Valley’s glittering skyscrapers, sneak into Bangalore’s secret startup dens, and even chill by the beach with coders from Africa brewing the next big tech revolution. No region is off-limits! Along the way, we’ll decode the whispers of rising tech trends – AI whispering innovation to your data, blockchain building invisible fortresses, and old giants like Java shaking hands with nimble new stars like Swift. We’ll peek into everyone’s toolbox, from open-source bazaars to enterprise treasure chests, and maybe even borrow a cool gadget or two.

All this, based on our most recent pulse report, Q3, 2023, which you can find here. But before that, if you  are a professional developer or know someone who is, consider participating in our ongoing 26th Developer Nation survey and contribute to the optimisation of the developer experience.

Enterprise Development isn’t just about gadgets and gizmos. This is about the passionate humans behind the code – the keyboard warriors battling bugs, the dreamers sketching the future, and the masterminds building software that’ll change the world (one line at a time!). Learning about enterprise developers is essential for a holistic understanding of software development, especially in  large organizations where the challenges and requirements are distinct from those of smaller projects. This knowledge can benefit various stakeholders, from business leaders and project managers to individual developers and technology enthusiasts. 

So, grab your coding backpack, your adventurous spirit, and your insatiable curiosity. It’s time to rewrite the jungle rules, one bug fix, one feature update, one innovative idea at a time. 

Regional Disparities

While regions like South Asia hold a scant 9.5% share of the world’s enterprise developers, North America, Western Europe, and Israel stand as towering giants, each wielding around 31% and 28.6% of the talent pool, respectively. This chasm in geographical distribution begs the question: what factors have sculpted such an uneven landscape?

Disparity in software development likely stems from socioeconomic and economic factors. Developed economies have better educational resources and established tech ecosystems, fostering a critical mass of skilled developers. Thriving tech hubs in other regions attract talent with promising careers and salaries while nascent ecosystems struggle to compete, hindering talent growth.

The stark disparities in the distribution of enterprise developers highlight the need for concerted efforts to bridge the digital divide and create a more equitable global tech landscape. By investing in human capital, fostering collaboration, and promoting inclusive growth, we can unlock the full potential of technology for all corners of the world.

Enterprise Developers' Geo

Technology Preferences

The technological preferences of enterprise developers paint a vivid picture of the industry’s driving forces. Web development and backend tasks reign supreme, captivating a whopping 82% of the developer pool. This focus reflects the ever-expanding web ecosystem and the crucial role of robust backend infrastructure in powering modern applications.

While web and backend rule the roost, mobile development and artificial intelligence (AI) are carving their own niches. With their ubiquitous presence in our daily lives, mobile apps attract roughly 35% of developers, driven by the ever-evolving mobile landscape and the insatiable demand for user-centric experiences. AI, though still in the early stages of enterprise adoption, holds the attention of around 33% of developers, hinting at its immense potential to revolutionise various sectors. 

Enterprise Developers Areas

Industry Spotlight: Software and Finance Lead the Way

Beyond technologies, the industries drawing developer interest are equally revealing. Software products and services take the crown, with nearly 40% of developers gravitating towards this dynamic domain. This affinity stems from the constant churn of innovation and the fast-paced nature of the software world. Financial services and banking, with their complex data landscapes and growing reliance on technology, come in a close second at 21.6%, showcasing the increasing convergence of finance and technology.

These trends signify a close interplay between developer preferences and industry needs. The prevalence of web and backend development aligns seamlessly with the software and financial sectors’ demand for a robust online presence and advanced data processing. Simultaneously, the growing interest in mobile and AI mirrors the increasing importance of user engagement and data-driven insights across various industries.

Understanding these connections provides valuable insights into the future of enterprise development. The emphasis on web, mobile, and AI is expected to strengthen, driven by both developer enthusiasm and industry demands. As these technologies advance, the software and financial sectors will likely stay ahead, attracting and fostering top developer talent.

Enterprise Developers industry verticals

CI/CD Practices

As the software development lifecycle evolves, Continuous Integration and Continuous Deployment (CI/CD) practices have become indispensable. Jenkins emerges as the dominant force in this arena, enjoying a staggering 66.5% usage. GitLab’s self-hosted version follows suit, while IBMCode and TeamCity trail as smaller players. Notably, Jenkins is popular in organizations with over 1,000 employees, with self-hosted GitLab closely behind at 37.2%. Azure Pipelines, IBM UrbanCode, and TeamCity cater to smaller segments of the market.

CI/CD tools

Containerization and Cloud Services

The age-old frustration of “It works on my machine but not yours” has become a relic of the past, thanks to containerisation technologies like LXC and Docker. These container technologies are especially favoured by backend developers, commanding an impressive 61.8% usage. Database-as-a-Service (DBaaS) is also prominent at 34.6%. In the backend developer’s toolkit, cloud monitoring services are vital, with 23.7% usage.

top 5 technologies used by backend developers

DevOps Tooling

In the DevOps domain, GitHub is the leader, commanding a substantial 28% usage. Google Cloud Developer Tools follow closely at 13.8%, while AWS CodeCommit lags  with just around 8% usage. These statistics underline the importance of collaboration and version control in the modern software development landscape.

top 5 technologies used by devops

Conclusion

The enterprise development world is dynamic and shaped by regional influences and technological preferences. As we navigate the evolving landscape, it is clear that specific tools and practices have become integral to the development lifecycle. Whether it’s the dominance of Jenkins in CI/CD or the widespread adoption of containerisation technologies, staying informed about the trends is essential for developers and businesses alike. As we move forward, anticipating and adapting to these shifts will be key to thriving in the ever-changing enterprise development world. 

If you are an enterprise developer, I’d love to connect with you personally and learn more about your work and day-to-day challenges and how Developer Nation and SlashData can help you from our decades of experience in Developer Market Research and community building. Please reach out to me at ayan.pahwa@slashdata.co or on social media. Cheers!

– @iAyanPahwa 

Categories
Tips

Passwords are DEAD, Let’s meet Passkeys and our new State of Software Supply Chain Security Survey 

Let’s get real. It’s a pain generating unique long alpha-numeric passwords and 2-factor authentications for every web or app service we use today, often ending up using the same old password (we can remember) across services and skipping 2fas if not enforced. Even if you use a password manager to generate and auto-fill your state-of-the-art strong passwords, you’re still vulnerable to attacks like Phishing, where a website looks identical to the one you are trying to access, although in reality it is a fraudulent copy -trying to use and steal your passwords as soon as they’re entered. 

Using a 2-factor authentication is handy in this situation. Still, it involves either SMS-based OTPs or authenticator apps like Authy or Google Authenticator for TOTPs, requiring cellular connectivity or installation of additional apps. Not to mention, if you lose your password manager, it will be a nightmare. 

Enter Passkey 

Passkey is a new passwordless authentication, standard by the FIDO alliance that aims to replace passwords and 2FAs, providing a faster, easier, and more secure authentication process.


Passkeys work on public-key architecture, generating public and private keys for each web or app service you use. The public key is saved on the web/mobile service server you intend to use, and the private key is kept securely on your local device, e.g. your Smartphone. Every modern smartphone processor today has a Secure Element which will generate and save these passkeys, which means not even  you can  read or directly access your private key. 

Whenever you want to authenticate on a service,- a signature generated from your saved public key will be sent to your device, and you can authenticate this signature using your private key + Biometric Authentication, e.g. your device PIN, fingerprint or Face ID. Once the signature from the public key and private key matches, you’ll be successfully logged in, meaning you don’t have to enter any password or OTPs, saving you from creeping eyes while entering your passwords in the coffee shops. The Private key never leaves your device, and you don’t need to remember everything, + it’s Phishing proof since Phishing sites won’t have your public key anyway 😉 

So, to actually hack you, the hacker will require your device + your fingerprints/FaceID, and I don’t wanna imagine that scenario anyway.

Passkey in Action

Every service you wish to use will generate a unique passkey that can be synced across all your devices using the ecosystem cloud sync, e.g. iCloud or password manager provided by your browser. You can also share your passkeys with devices and people you want. Hardware keys like Yubikeys can also be used to generate and save passkeys. If you’re on a desktop, you can still use your mobile device for passkey authentication using QR codes generated by the services while trying to log in. The QR code can then be scanned by your phone and finished with the passkey authentication. 

For businesses, it saves cost on OTP services you provide for your users, and it’s pretty easy to add support for passkeys in your web or mobile applications using already existing authentication APIs offered for all major platforms – iOS, Android, Chrome, etc.

To start with Passkeys, look at the services already supporting it at https://www.passkeys.io/who-supports-passkeys and join the Passwordless train.

Take the survey

Participate in our ongoing survey and share your thoughts to help us and our partners build a secure experience for You! 

Categories
Tips

Headless Raspberry Pi Setup – WiFi and SSH

Setting up a new Raspberry Pi Board can be daunting without a monitor and keyboard, Once you flash a new image of the Operating System – Raspberry Pi OS or similar, the next obvious step is to boot the Pi, log in to it and access the terminal over SSH. But for a headless setup, i.e. without a Monitor and Keyboard, it’s not that straightforward. The same goes if you’re using a lite image of the OS (without a Desktop Environment). For SSH to work, you first need to get your board on your home network, even if you manage to create an ad-hoc network between your Pi and workstation, the SSH is disabled for security reasons. 

Are you ready to influence the tech landscape too? Take part in the Developer Nation survey and be a catalyst for change. Your thoughts matter, and you could be the lucky recipient of our weekly swag and prizes! Start Here

There are two simple ways to sort this out, and we’ll look into it one-by-one 

#1 The Simple Way: Using the official Raspberry Pi Imager, 

Raspberry Pi’s official flashing utility can be downloaded from here . This tool allows you to pick the OS image you want to flash. It also has a setting page where you can enable SSH and add credentials of your home router WiFi SSID and password. All this information is baked into the OS image during the SD card flashing process.

#2 The Ninja Way: Underneath the hood 

While the Raspberry Pi Imager way works pretty straightforward, for the ninja user, it’s important to understand how this all works underneath the hood. So the job of the flasher programmer is to partition your SD card into two segments – BOOT and the Root File System (rootfs) of the raspberry pi. This is how typical how Linux distributions are stored. 

The boot partition holds all the essential files used during the booting process, including the bootloader, and the rootfs partition holds the primary filesystem of the Linux operating system. Now let’s add settings for our WiFi connection and enable SSH on the raspberry pi board the ninja way. 

Once you flashed a new operating system, the SD card shall be auto-ejected, so re-insert the SD card, and you shall see a partition named BOOT mounted on your system. Create a new file in the root folder of the boot partition with the exact name – wpa_supplicant.conf. In this file add following using your favourite text editor or terminal: 

“` code-block

This information shall be used by “wpa_supplicant”, a utility used by Linux distributions like Debian to connect to wifi networks. After the boot is complete, it’ll scan for WiFi networks nearby and connect to your SSID and password you supplied. 

Don’t worry about supplying your password in plain text, after the boot, this file will be removed automatically.

Now to enable SSH, which is disabled by default for security, just create a new empty file with the name ssh in the root directory of the boot partition. Use the terminal command to create this file 

And that’s it, your raspberry pi will be connected to your WiFi network and ready to accept incoming SSH connection requests, and all this is done without ever connecting your board to a monitor and keyboard – Headless. 

Test your SSH connection from your workstation open the terminal, and type:

and you shall be logged in.

Found this tutorial interesting? Read more about the latest trends in Embedded System development in our previous blog here and take your embedded projects to IoT using MQTT via this blog here .

Categories
Community

Introducing Developer Nation forums

It’s been a while (read 3 months) since we launched the Official Developer Nation forum along with our revamped website. But we have yet to make a formal announcement about it. This blog will serve as an official bulletin illustrating our rationale behind launching a self-hosted forum for Developer Nation.

Being a global community, we are aware that developers worldwide depend on us and each other for support, sharing ideas, collaboration, and diverse perspectives to make informed decisions in their programming journey. However, we didn’t want to hastily create yet another Discord server or Slack workspace without careful consideration, which could result in unanswered queries and inactivity.

How we support our global developer community 

We have been providing extensive assistance to our community members via email for a considerable period. Our support ranges from answering their questions, and connecting them with relevant individuals in the community, to sharing developer market research reports upon request from our vast data repository. We also extend it to help them with job hunting, among other things. However, we noticed all this happening behind closed doors, isolated from the rest of the community, for no reason but a lack of an open platform. Even if another developer had a similar query or request, they could not benefit from previous conversation flows with other members. Therefore, we decided to take this to the next level by providing the community with a platform to collaborate openly and benefit from the conversations other members are having.

Announcing Developer Nation Forums

Developer Nation forums are our discourse server which can be accessed at: https://forum.developernation.net/, now without actually telling you what you can do here, I would highly encourage you to check it out yourself and consider this our community playground where nothing is wrong, and everything posted is regarded as a healthy flow of conversations within the community. We’ve created the categories we see fit (for now), but this is ever-evolving as we receive community feedback. 

One of the key goals of creating our own forums is to help our community self-serve themselves; that means once the forums have significant conversations, the chances of you finding an answer to your query increase by many folds. Thus, new members can better navigate our community and surveys and get support without needing to reach out to us personally.

Apart from creating your own threads and participating in conversations started by other community members, you can customise the look and feel from dark to light mode. Feel free to explore more and share your feedback with me on how we can make it better and more inclusive for everyone. I believe our community members will generously help each other on the forums and make it a sustainable healthy hangout place for all the members.

P.S: Since every member of the Developer Nation community team, including me, spends time on forums every day, the chances of your query being addressed are relatively high there.

I’ve created this short video as a quick crash course on using the forums for the first time; check it out, and I look forward to welcoming you there. Cheers!

– Ayan